Introduction
Delivering the right message isn’t always easy. Is it?
Words can often explain themselves—but what about visuals
Apple’s design guidelines, Nike’s impactful campaigns, or Instagram’s iterative user experience updates, behind every iconic visual, lies precise feedback, iteration, and most importantly- annotation.
Having worked on countless design processes, for more than 14 years now I know how challenging it often gets to ensure that design ideas and feedback translate into intended results.
You might wonder—why focus so much on something so seemingly simple? For one, annotations make your visuals speak louder. And it’s not just about marking your image. It’s about making ideas clearer, improving collaboration, and bringing clarity, precision, and meaning to every design conversation.
From marketing teams to project managers to AI developers, understanding how to annotate an image can streamline workflows and elevate outcomes.
In this article, you’ll learn:
- What image annotation is and why it matters.
- Tips and best practices for effective image annotation.
- Tools, use cases, and tips to help you master this essential skill.
What is image annotation?
Image annotation is the process of adding supplementary information to an image in the form of notes, labels, or markers to provide additional information, clarify its content, or highlight specific details. This can include comments on layout, color schemes, typography, and other visual aspects. The goal is to facilitate clear communication among team members and clients, ensuring that everyone understands the necessary changes or enhancements needed for the design to succeed
In practical terms, image annotation could involve:
- Labeling parts of an image (e.g., marking the “door” and “windows” in a blueprint).
- Highlighting key areas (e.g., circling a section of a chart).
- Adding explanatory text to clarify what an image represents.
Importance of image annotation
Having worked with diverse teams of designers, engineers, and marketers, I’ve repeatedly witnessed one truth.
A small clarity in visual communication can avoid massive miscommunications.
Whether you are brainstorming for an ad campaign, reviewing a product blueprint, or fine-tuning a design concept, annotations create a shared understanding that can be the difference between success and setbacks. Nowadays, many associate image annotation with AI and machine learning tasks like object detection but its power extends to everyday workflows, especially for creative and collaborative teams. Let me share why it’s important:
- Bridges the communication gap
Ever sent a lengthy email explaining edits to a designer, only to have them miss the mark? Image annotation eliminates this back and forth by letting you show exactly what you mean. Trust me, a few quick notes or shapes on an image speak a lot louder than paragraphs of text.
In a recent campaign, I used annotated visuals to explain layout tweaks. And this could have taken hours of discussions to turn down into a five-minute conversation with all stakeholders aligned.
- Keeps feedback organized
Clarity and structure are key to staying ahead. With annotations, you can categorize and label elements in an image to make it easier for everyone to follow. It’s like adding a roadmap to your visuals, whether working on a graphic design project or managing product visuals.
I remember an internal project where missing annotations caused a lot of confusion and delayed delivery by days. Since then, I have ensured every visual is annotated upfront, making it easy for collaborators to stay on the same page.
- Improves team collaboration
Creative teams thrive on collaboration but face the challenge of balancing different ideas and feedback. Image annotation gives everyone—from designers to decision-makers—a platform to contribute without confusion.
- Reduces rework and improves accuracy
If there’s one thing I’ve learned, clarity upfront saves countless hours later. Annotations record what needs to be done, reducing errors and ensuring the final result meets expectations.
An annotated website wireframe prevented us from a costly redesign by ensuring all stakeholders approved the layout before coding began.
- Long-term documentation
Annotations aren’t just for immediate feedback but also as documentation for future reference. Whether it’s a branding project or a website update, annotated visuals make it easy to revisit decisions and maintain consistency.
Years ago, I revisited annotated visuals from an old project to onboard a new team member quickly. And it was like opening a treasure chest of past insights, allowing us to pick up where we’d left off effortlessly.
No matter your role, collaborating with a designer, or managing a project, image annotation ensures clarity, speeds up workflows, and ultimately helps you deliver better results.
While this article focuses on everyday applications, the principles behind annotation—precision, clarity, and alignment—are universal.
How to annotate an image: Tips and best practices
Image annotation is a reasonably straightforward process.
In a typical workflow:
- You determine what needs to be highlighted or explained within the image.
- Use tools to mark specific areas, add text labels, draw shapes, or include comments to convey your feedback or information.
- Share the annotated image with stakeholders or team members to gather input, refine ideas, or guide changes.
However, getting your message across is not that simple. Based on my experience working with diverse teams and projects, here are actionable tips to ensure your annotations make a real difference:
1. Choose the right tools for your team
All annotation tools have something unique to offer besides the basic annotation functionality. I suggest looking for tools that integrate with your existing project management tools and techniques, ensuring that annotations seamlessly fit into your workflow, whether you’re assigning tasks, tracking feedback, or managing deadlines. It will help you assign specific feedback to team members and monitor progress directly from your dashboard.
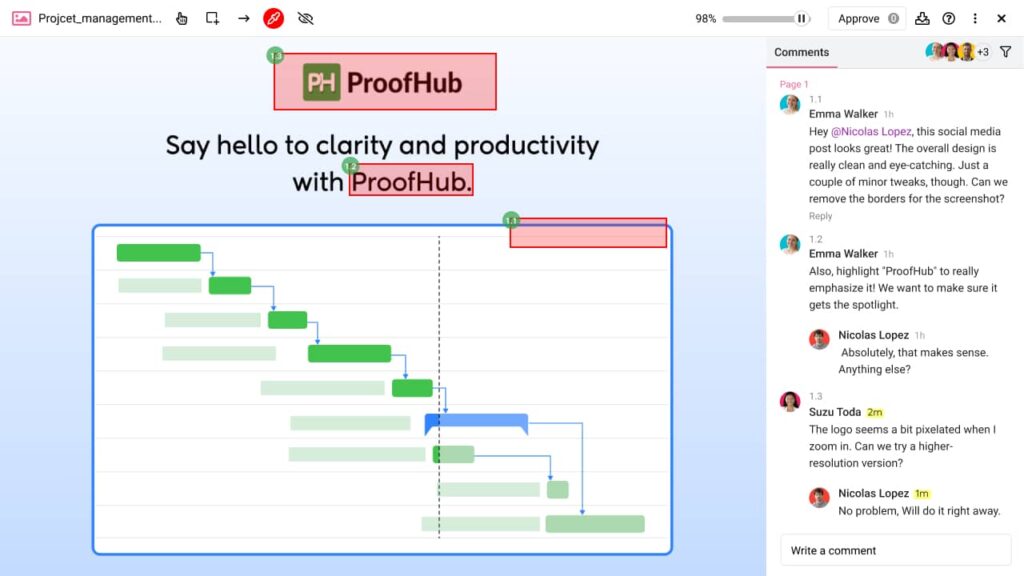
Note: If you haven’t yet, I highly recommend checking out ProofHub’s in-built proofing feature. It is designed as a core part of the platform, allowing you to annotate images and share feedback without needing to rely on external tools. This means your team can focus on managing tasks and deadlines, knowing that proofing is already built into the workflow.
2. Focus on clarity and simplicity
Annotations should make visuals easier to understand, not more complicated. Whenever I collaborate with external creative teams, they often appreciate the clarity and specificity of my feedback. Even if they do not agree with my take on how the information should be presented, they value not having to sit through another half-hour video call to understand what needs to be done.
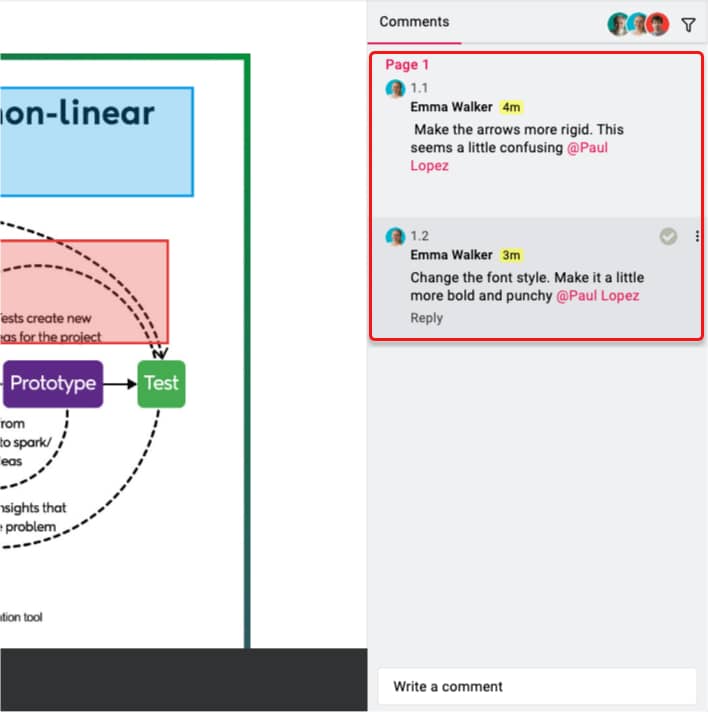
Use clear labels, concise comments, and consistent markers to ensure your feedback is actionable. Instead of saying “Fix this,” provide specific instructions such as “Increase padding between the header and the first paragraph for better readability.”
3. Collaborate in real-time
Modern workflows demand fast, clear, and context-specific communication. Instead of relying on endless email threads, use the email alternatives to share feedback directly on images.
Real-time annotations eliminate delays and ensure all stakeholders can view and respond to feedback instantly, fostering smoother collaboration.
4. Align annotations with project goals
Annotations are most effective when they directly support project goals. For example, before marking an image, think about where your feedback falls under specific objectives, like improving user experience, meeting a deadline, or aligning with brand guidelines. This ensures your input is relevant and actionable.
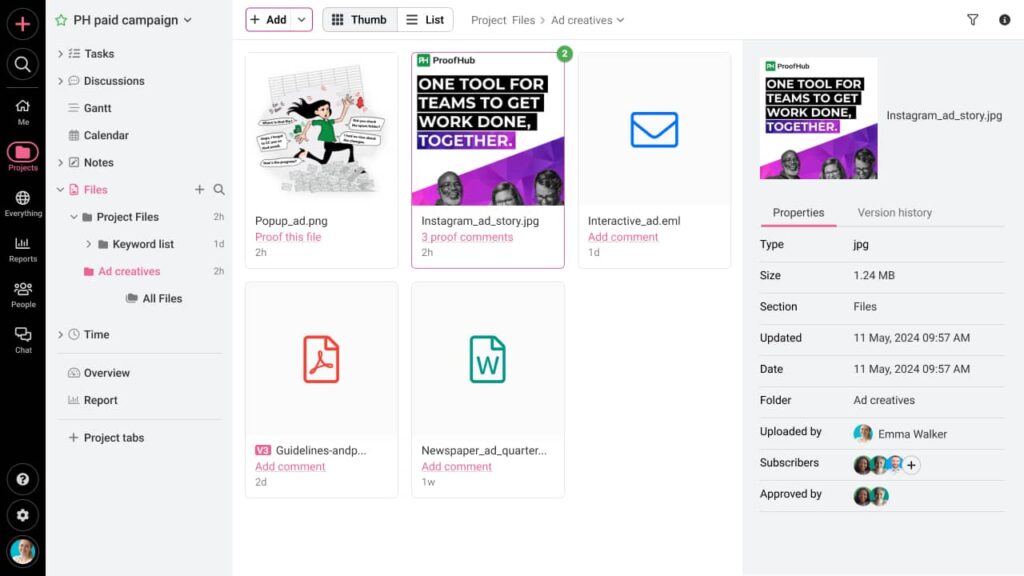
When managing large-scale projects, use annotations strategically to address key milestones or communicate dependencies. For instance, if a webpage’s header design affects the placement of navigation links, highlight this dependency clearly in your annotation to avoid confusion later in the process.
5. Keep your annotations organized
When working on complex visuals, disorganized annotations can quickly become overwhelming and counterproductive. To keep feedback manageable, I organize them by priority or category and use visual cues like color-coding or labels.
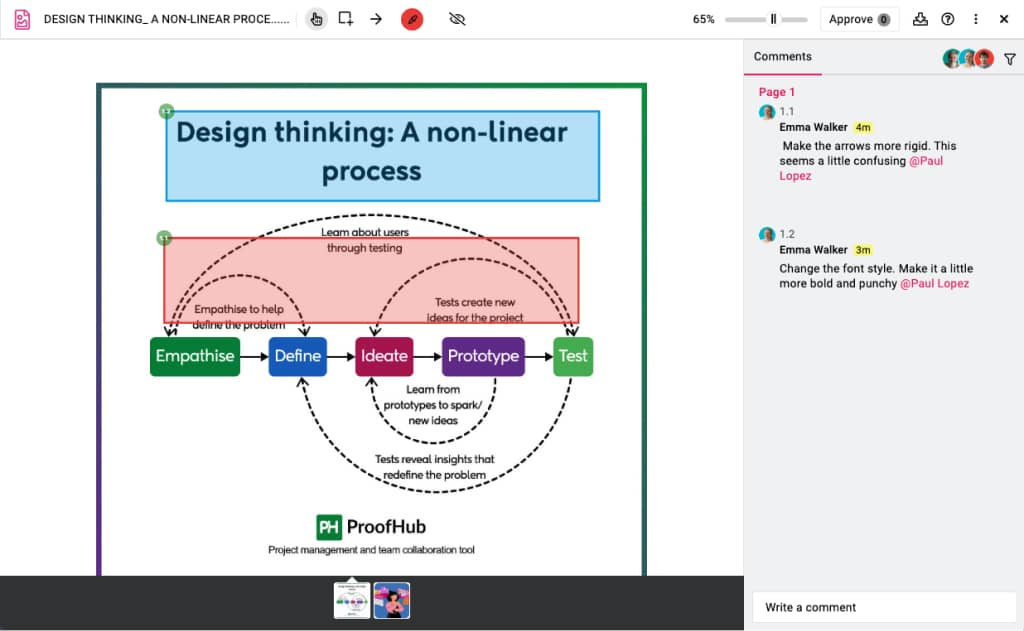
For instance, I use red to highlight urgent revisions that need immediate attention—like fixing alignment issues in a design mockup before a presentation. Blue is for non-critical suggestions, such as exploring alternative font choices, and green flags questions, like clarifying missing assets or confirming adherence to brand guidelines. This system not only keeps my feedback clear but also helps my team focus on what’s most important without feeling overloaded.
6. Encourage participation
Annotations are not just for managers or designers—they invite input from everyone involved. Different perspectives can add valuable insights and ensure the final result meets all requirements. For example, while I may focus on ensuring the design aligns with the marketing strategy, my developers might use annotations to flag technical feasibility, and clients might highlight aspects related to their end users.
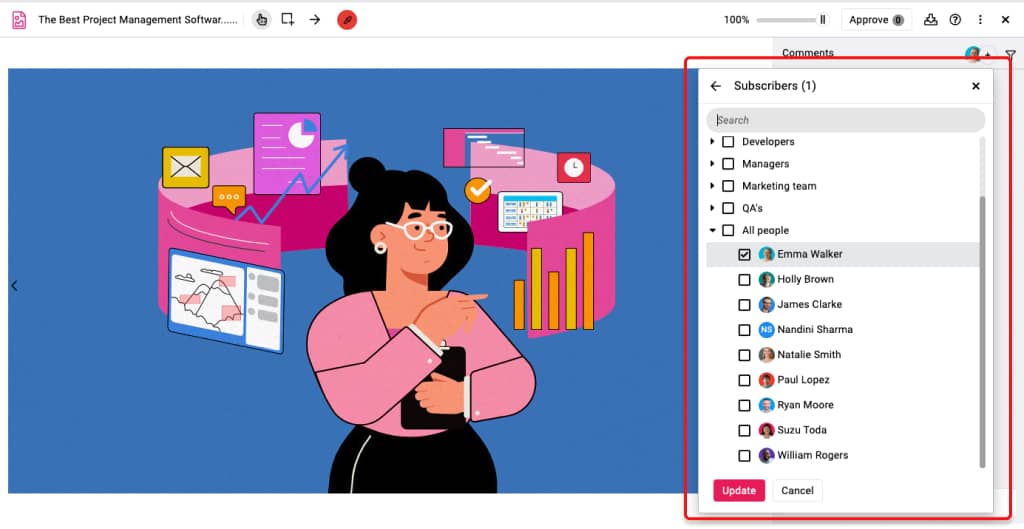
By following these tips, you can maximize image annotation as a tool for improving collaboration, clarity, and efficiency. Integrated with tools like project management software and email alternatives, annotations can transform how teams communicate and deliver results.
5 Tools for image annotation
Choosing the right image annotation tool can significantly impact the way teams collaborate and manage feedback. The tools we’ve covered in this section cater to diverse needs—from simple visual feedback to integrating annotations into comprehensive project management workflows.
1. ProofHub
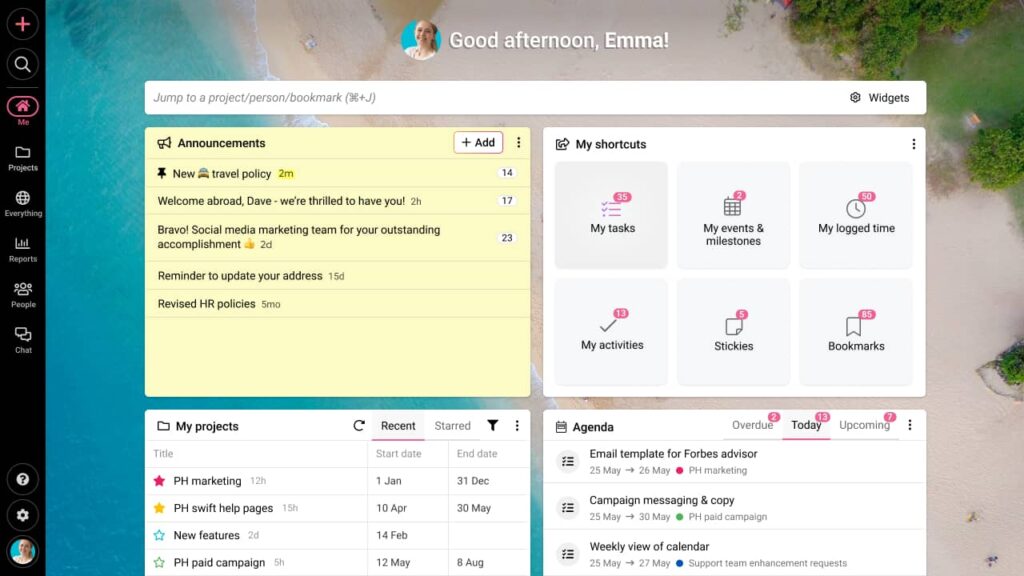
ProofHub is an all-in-one project management and team collaboration tool that includes proofing as one of its core functionality. At Proofhub, we are highly invested in reducing the app overload for modern-day knowledge workers, and hence, we offer image annotation capabilities as a subpart of our collaboration tools. It is designed for teams looking to streamline their workflow by integrating project management with visual feedback processes. ProofHub helps users with task tracking and communication by providing a centralized platform where teams can discuss, annotate, and approve images efficiently.
Features
- Inbuilt proofing, review, and approval.
- Version history tracking for each asset.
- A comprehensive suite of project management and collaboration features.
- All feedback, discussions, and annotations are in one place.
- Control who can view and comment on annotations.
- Immediate visibility of changes and feedback as soon as it’s added.
Pros
- Combines project management and team collaboration into one tool, reducing the need for multiple tools
- Offers comprehensive reporting features for performance tracking
- One flat price with no per-user fee
Cons
- Some users find the interface cluttered due to the multitude of features
- Image annotation features may not be as advanced as dedicated tools
Pricing
Starts at $45 per month for unlimited users and projects.
If you’re looking for a complete, all-in-one tool that covers both project management and image annotations, ProofHub is an excellent choice. It’s especially helpful for teams who need to manage tasks, discussions, and images all in one place.
2. Annotely

Annotely is a collaborative image annotation tool designed for teams needing efficient feedback on visual content. It simplifies the annotation process for design teams, marketing departments, and any group that relies on visual content for communication. It turns the inefficient review cycles into a well-coordinated image feedback process. I found its minimalistic interface particularly valuable for those who want quick, direct feedback without bells and whistles.
Features
- Multiple users can annotate images simultaneously.
- Users can leave comments and tag team members for specific feedback.
- Design version control to keep track of changes and allow users to revert to previous versions.
- Works seamlessly with popular design platforms like Figma and Adobe XD.
Pros
- User-friendly interface
- Real-time updates
- Supports various file formats
Cons
- Limited advanced features compared to some competitors
- It may require a learning curve for new users unfamiliar with annotation tools
Pricing
Offers a free tier with basic features, while premium plans start at $15 per user per month.
If you are a creative agency and just want to replace emails or another communication tool for input on your assets, you don’t need to look beyond Annotely. However, if you are looking to holistically improve the productivity and efficiency of your teams, the following list has much more to offer.
3. MarkUp.io

MarkUp.io is a browser-based tool for visual feedback that allows users to annotate images directly in the browser. It is particularly suited for creative teams needing to provide detailed feedback on designs and prototypes. MarkUp.io helps streamline the feedback process by allowing all stakeholders to comment directly on the visuals, making communication clearer and reducing unnecessary back-and-forth.
Features
- No downloads are required; it works directly on web browsers.
- Allows users to capture screenshots for immediate feedback.
- Users can create templates tailored to specific projects or clients.
- Connects with other tools like Slack and Trello for seamless workflow integration.
Pros
- Simple setup with no installation required
- Facilitates quick feedback loops with visual context
- Highly customizable for various project needs
Cons
- Limited offline functionality as it relies on internet access
- Some advanced features are only available in higher-tier plans
Pricing
Free plan available, paid plans start at $25 per user per month
4. Pastel

Pastel is an intuitive image annotation tool designed specifically for web designers and developers. It allows teams to gather visual feedback from clients or stakeholders directly on web pages or images. Pastel effectively solves the problem of unclear feedback by providing a platform where comments can be made directly on the visuals being discussed, thus enhancing clarity in communication.
Features
- Users can annotate live web pages without needing additional software.
- Easily share links with clients to gather their input.
- Comments are pinned directly to specific areas of the image or webpage.
- Keep track of changes made during the review process.
Pros
- Streamlines client feedback processes significantly
- Easy sharing options enhance collaboration with external stakeholders
- Visual context makes feedback clearer and more actionable
Cons
- Primarily focused on web design rather than broader image types
- Limited functionality outside of web page annotations
Pricing
Free trial available; subscription plans start at $15 per month for small teams.
5. MarkUp Hero

MarkUp Hero is a versatile annotation tool that allows users to capture screenshots and annotate them easily. It is aimed at professionals who need to provide clear visual feedback quickly. By simplifying the process of capturing and annotating images, MarkUp Hero addresses challenges related to traditional documentation methods, making it easier for teams to communicate visually.
Features
- Quickly capture images from your screen for annotation.
- Includes arrows, shapes, text boxes, and highlighting options.
- Generate links that allow others to view and comment on annotations easily.
- Integration options with other apps, such as Slack and Google Drive.
Pros
- A fast and efficient way to provide visual feedback without complex setups
- User-friendly interface suitable for all skill levels
- Supports quick sharing of annotated images via links
Cons
- Lacks some advanced project management features found in other tools
- Primarily focused on screenshots rather than comprehensive image libraries
Pricing
Offers a free version; paid plans begin at $10 per month per user
Use cases for image annotation
Image annotation is one of those tools that can completely transform the way you work. It’s simple to use, yet its impact is felt across different fields and professions. By making visual communication clearer and feedback more actionable, it helps teams, freelancers, educators, and agencies save time, reduce misunderstandings, and deliver better results. Here’s how image annotation can make a real difference:
1. For designers
Designers suffer with the frustration of vague feedback a lot. Image annotation takes the guesswork out of the equation by allowing clients and team members to leave precise, visual notes. Whether it’s tweaking a layout, adjusting colors, or fixing spacing, designers can focus on what matters without endless back-and-forth.
Here’s how:
- It eliminates unclear instructions by letting feedback live directly on the image.
- Saves time by streamlining revisions and reducing unnecessary emails or meetings.
- Keeps creative projects on track with clear, actionable insights.
From web design to UX prototypes, image annotation is a must-have tool for keeping everyone aligned.
2. For remote teams
Remote work thrives on effective communication. But when teams are spread across time zones, emails and chat threads aren’t always enough to explain visual feedback. Image annotation solves this by creating a shared space where everyone can collaborate seamlessly—no matter where they are.
- Makes remote collaboration smoother by letting team members provide input in real time or asynchronously.
- Prevents misunderstandings with direct, visual feedback instead of lengthy descriptions.
- Keeps global teams connected, productive, and focused.
For virtual teams and freelancers, it’s like having everyone in the same room—even when they’re miles apart.
3. For creative agencies
Managing client feedback is one of the biggest challenges for creative agencies. Image annotation helps streamline this process by organizing input, tracking changes, and ensuring nothing gets overlooked. It’s a simple way to stay on top of revisions and deliver work that exceeds expectations.
Here’s how:
- Helps agencies manage feedback from multiple clients efficiently.
- Keeps projects moving forward by simplifying communication between departments.
- Allows for quicker turnaround times without compromising on quality.
From ad campaigns to branding projects, image annotation keeps agencies organized and their clients happy.
4. For educators and students
In the classroom (or virtual classroom), image annotation turns static visuals into dynamic learning tools. Teachers can give targeted feedback on assignments, while students can annotate study materials or collaborate on group projects. It’s a hands-on way to learn and grow.
Here’s how:
- Gives teachers a direct way to show students what’s working and what isn’t.
- Encourages students to actively engage with digital content by adding notes or questions.
- Simplifies teamwork on group projects by creating a space for discussion and collaboration.
For design schools and educational settings, it’s an interactive approach to modern learning.
Image annotation might seem like a small detail, but its impact is anything but minor. By helping people communicate visually, it’s reshaping how we work, collaborate, and create. Whether you’re a designer, remote worker, or educator, this tool is your shortcut to clarity and success.
How does image annotation work in ProofHub
ProofHub simplifies the process of image annotation and feedback by integrating proofing tools directly into its platform. This feature is designed to enhance team collaboration and streamline the review process. Here’s how it works:
1. Reviewing files
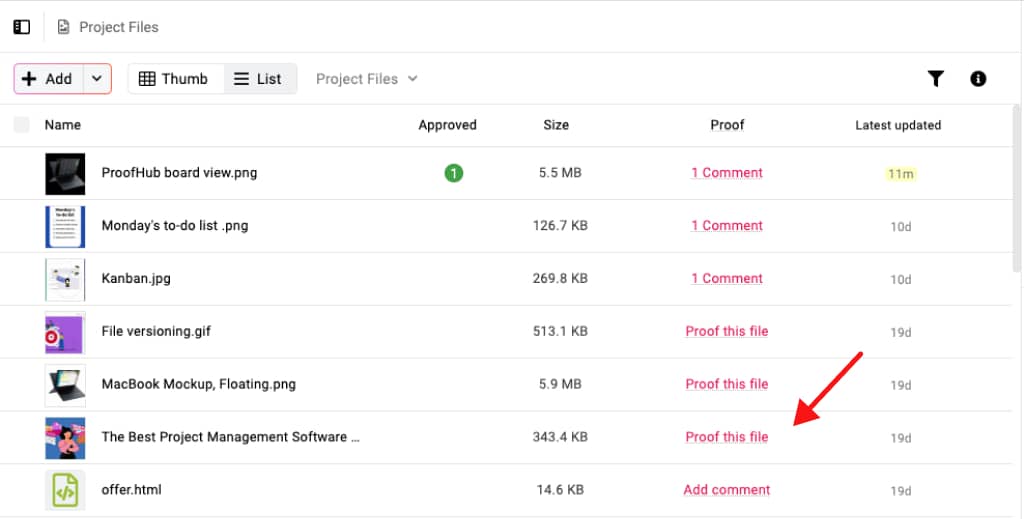
Start by uploading an image or document (PDF, JPG, PNG, GIF, BMP) you want to annotate into ProofHub. Once the file is uploaded, you can double-click on it or select the “Proof this file” option to open the proofing window.
2. Annotating and commenting
The proofing window provides easy-to-use markup tools like a rectangular box and an arrow to highlight specific areas on the image that need attention. Use the comment field to provide specific feedback alongside the markup for better context.

When a comment is selected, the corresponding section of the image is highlighted, ensuring there’s no confusion about what the feedback pertains to. The annotation tools make the feedback even more precise, pairing your comments with visible markers on the image.
3. Collaborating through comments
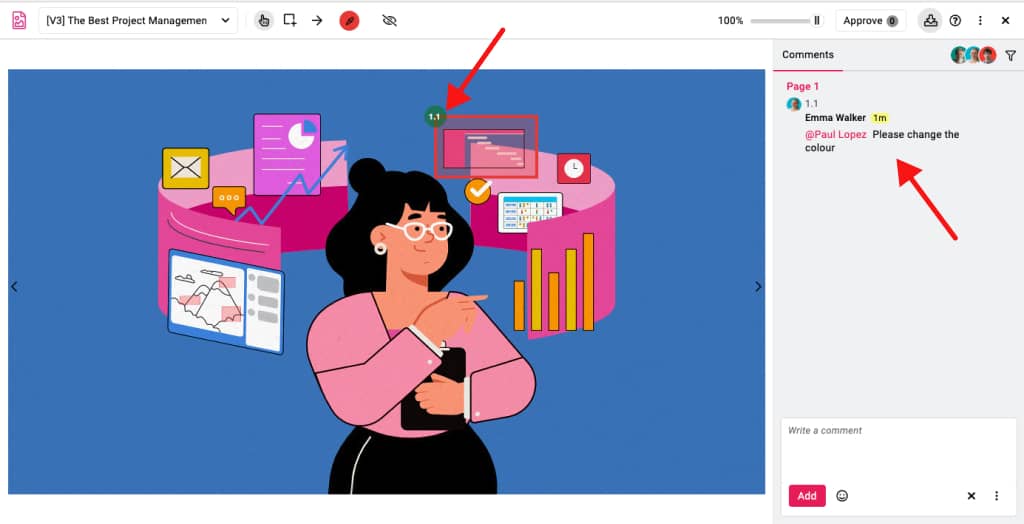
In ProofHub, you can have context-specific collaboration. Team members can reply to specific comments, turning annotations into collaborative discussions. If an issue is resolved, you can mark it as “Resolved,” or reopen it if additional edits are needed.
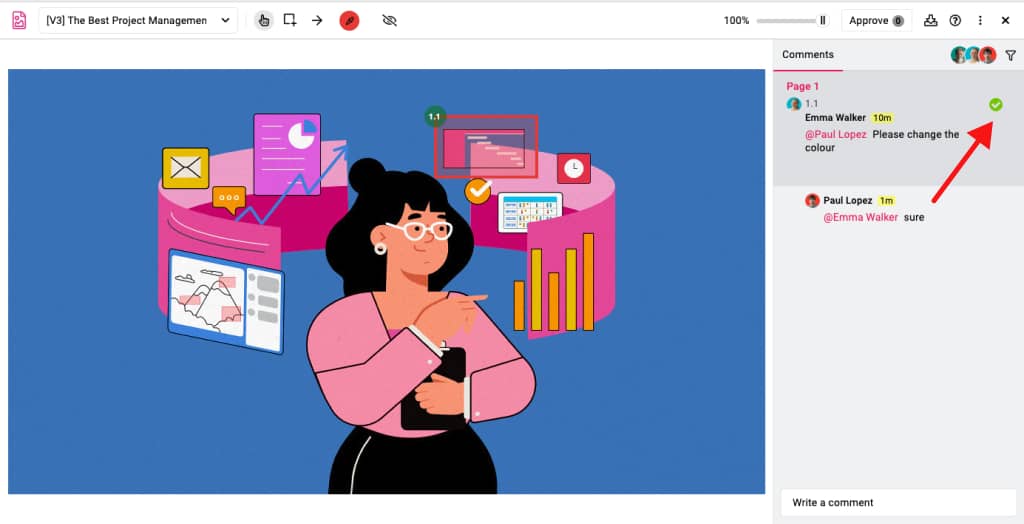
4. Approving files
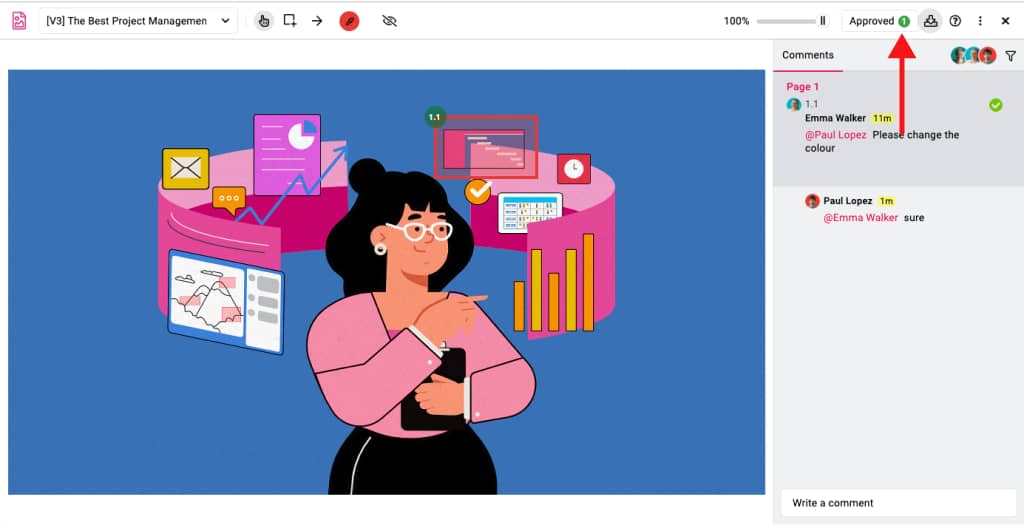
After all comments are addressed and marked as resolved, you can finalize the process by approving the file with the “Approved” button in the top-right corner. This ensures the document or image is ready for the next stage of the project.
5. Sharing Files
ProofHub allows you to share files for feedback and approvals with both internal and external collaborators. Internal users can access files directly, while non-ProofHub users can provide feedback via a “Proofing link” shared with them. External users simply need to log in with their email to access the proofing tools.
Why ProofHub stands out
What makes ProofHub’s image annotation feature unique is its integration into a broader project management ecosystem. This means teams don’t have to switch between multiple tools to manage tasks, communicate, and annotate files, making the workflow smoother and more efficient.
Whether you’re a designer seeking feedback or a project manager coordinating reviews, ProofHub’s annotation features help bring clarity and structure to the process.
Conclusion
Image annotation is a powerful way to enhance collaboration and communication, whether you’re part of a creative team, working with clients, or reviewing design concepts. By selecting the right tool for your specific needs, you can streamline the feedback process, save time, and improve the clarity of your visual content. From simple feedback loops to comprehensive design reviews, the right annotation tool can transform how you engage with images and make your workflow more efficient. Regardless of your project size, mastering the art of image annotation will ultimately lead to more effective and meaningful visual communication.
FAQs
What is the purpose of image annotation?
The purpose of image annotation is to make visuals easier to understand by adding meaningful feedback or clarifications directly onto the image. This can include pointing out areas for improvement, highlighting key elements, or sharing instructions. It’s a collaborative tool that helps teams communicate more effectively, avoid misunderstandings, and streamline workflows, especially in creative, technical, or design-related projects.
How do I choose the right tool for annotating images?
Choosing the right annotation tool depends on your specific needs. Think about how well the tool fits into your existing workflow and whether it integrates with your favorite apps, like project management or communication platforms. Consider the size and skill level of your team—some tools are easier to use, while others come with advanced features. Look for tools that support the file types you commonly use, and don’t forget to check the pricing. Many tools offer free trials, so test a few to find the one that feels intuitive and solves your challenges efficiently.
What is the difference between annotation and markup?
Annotation and markup both involve adding information to an image or document, but they have different focuses. Annotation is primarily about collaboration—it’s used to provide feedback, explain changes, or highlight issues. Markup, on the other hand, is more technical and often used for formatting or editing purposes, such as preparing a document for final approval. Think of annotations as collaborative notes and markups as functional edits. Both are important in their own ways, depending on the context.

