Introduction
A project timeline is more than just a visualization tool; it’s a strategic framework that shapes and structures a project’s progression. It can be thought of as a visualization of the project schedule with critical milestones, activity organization, and workflow alignment so that the team members understand where they are headed, what is expected of them, and how their focused efforts contribute to the bigger picture.
With experience managing projects of all scales and complexities, I’ve learned that a thoughtful project timeline can make or break the project. The absence of one can lead to teams losing sight of priorities, wasting precious time and resources, and inviting disruptions that derail even the most promising initiatives.
However, when done correctly, a project timeline reduces misunderstanding, increases collaboration, and keeps everyone moving forward with clarity and purpose. Whether you’re developing software or launching a marketing campaign, a well-structured project timeline isn’t just beneficial; it’s essential to project success.
This article will walk you through creating a practical project timeline. We also break down the main components of this process, share some tried-and-tested best practices, elaborate on some hands-on examples, and define robust tools to help you craft a timeline fitting the specific needs of your project.
But before we get into the specifics, let’s start by understanding a project timeline and its purpose.
What is a project timeline?
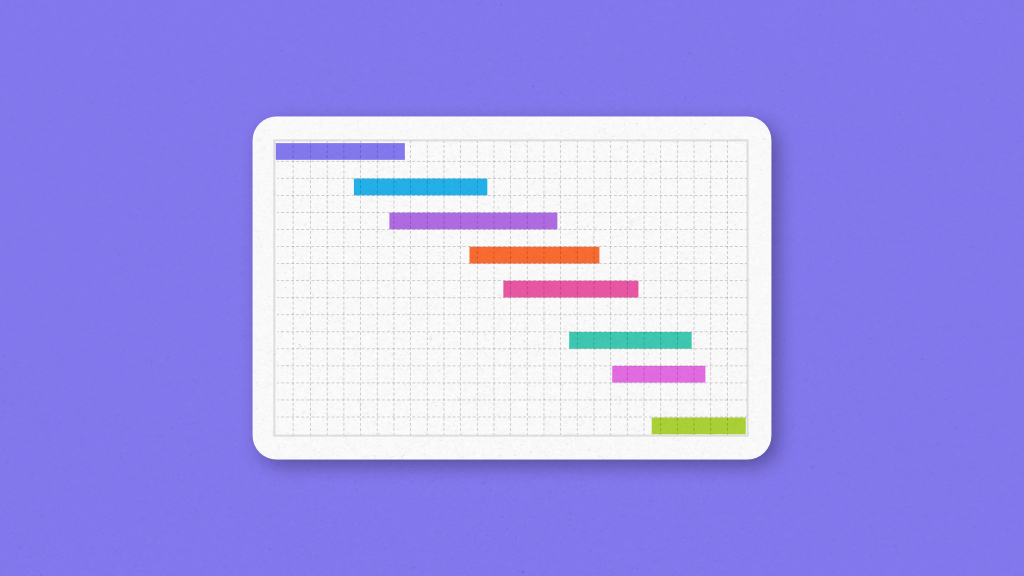
A project timeline visually represents your project schedule, outlining tasks or activities, milestones, and durations in a chronological sequence. Its ultimate goal is to ensure that defined objectives are completed within the stipulated timeframe, regardless of the project’s complexity or scale.
Where it helps project managers get a comprehensive overview of the entire project, offering insights into the current status, task dependencies, and project progress; teams gain a clear direction to invest their efforts towards, obtaining clarity on their job roles, tasks, and responsibilities.
Furthermore, project managers can dig in further to find out bottlenecks, optimize the use of resources, and establish realistic deadlines. They can also share it with the stakeholders so that they remain well-informed and aligned with the project’s direction in achieving a shared vision.
What are the key components of a project timeline?
The breakdown of the project timeline is as follows:
- Project Scope: A project scope is a comprehensive overview of project objectives, deadlines, deliverables, stakeholders, constraints, etc. This gives clear direction for the execution of the project, ensuring alignment with overall goals.
- Tasks and subtasks: Break down the project into smaller and manageable tasks and activities. Outline all these activities regardless of the size and complexity to ensure clarity and accountability.
- Milestones: These are the major checkpoints or events that mark the significant achievements in the project life.
- Duration and deadlines: Figure out the time required to complete each task, choosing the right units to represent the timeline (for example, days, weeks, or months). To stay on track, set start and finish dates.
- Dependencies: Highlight the task relationships to establish task sequencing for effective planning.
- Resources: Allocate resources to tasks based on availability, expertise, and workload.
- Visualization tool: Decide on the visualization formatting style to represent your timeline, e.g., Gantt charts, Excel, CPM PERT charts, etc. But before selecting one, make sure to evaluate the advantages and disadvantages of each method.
Explore the list of visualization charts for better project management
Steps to create a timeline in project management
Creating an actionable project timeline is a strategic process that heavily influences how seamlessly a project progresses from start to finish. A strong project timeline outlines the sequence in which tasks need to be executed, facilitating effective team collaboration, progress tracking, and risk mitigation.

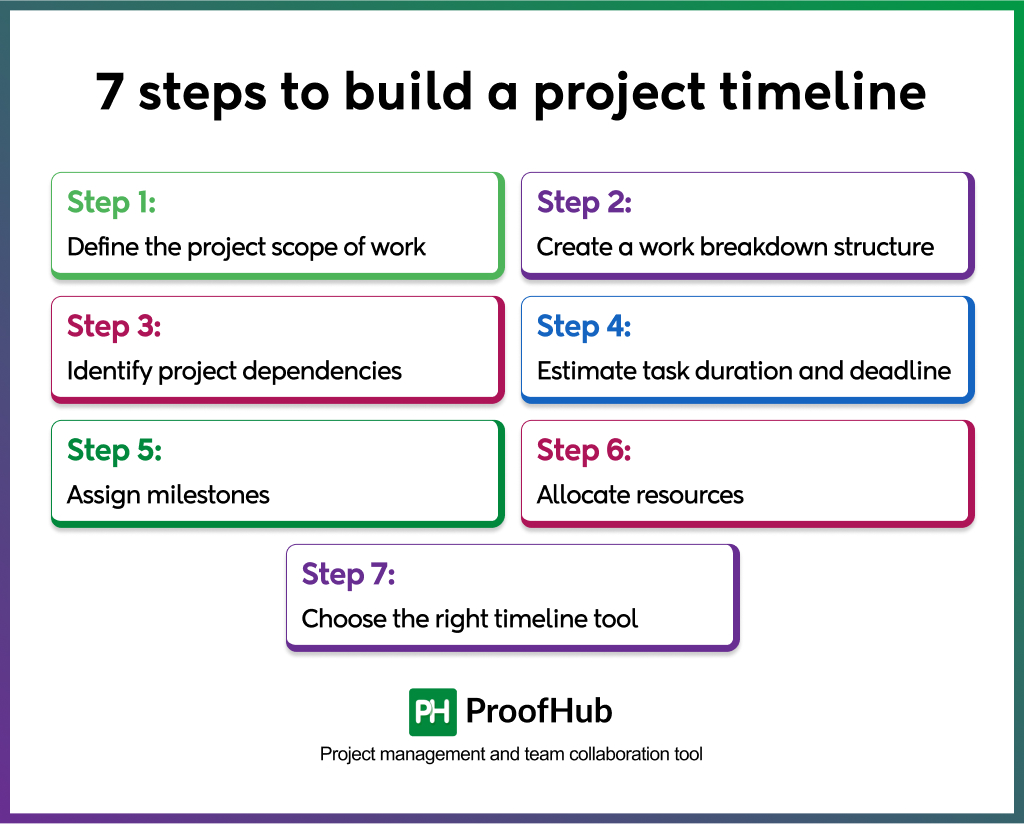
Here are 7 simple steps to build a project timeline to keep your projects on track.
Step 1: Define the project scope of work (SOW)
Start by crafting a comprehensive project scope statement that serves as the foundation for your project. This statement should outline all the information and critical components, including project requirements, assumptions, constraints, and boundaries.
Additionally, it should detail the objectives you aim to achieve, the tasks involved, the estimated time required, the list of potential resources, and the overall project timeline. By clearly defining these elements, the scope statement ensures your team stays focused, aligned, and informed throughout the project.
To prevent minor setbacks from derailing your schedule, it’s wise to build in some buffer time during this phase, ensuring your timeline remains flexible and manageable.
Understand project scope management to meet objectives and deliver on time
Step 2: Create a work breakdown structure (WBS)
Next up, organize tasks using a work breakdown structure—a visual, hierarchical framework that divides your project into major deliverables, breaking them down further into milestones, smaller systems, and sub-deliverables.
WBS, as defined by PMBOK, is ‘”deliverable oriented hierarchical decomposition of the work to be executed by the project team”
The main objective of the WBS is to clearly outline all tasks associated with each deliverable while maintaining a logical hierarchy and chronological order. By doing so, it:
- Eliminates the scope for unplanned or redundant work
- Informs team members of their responsibilities
- Provides documentation for tracking progress and meeting deadlines
Explore our guide to get a comprehensive understanding on Work Breakdown Structure (WBS)
Step 3: Identify project dependencies
Once you have compiled your list of tasks and activities, it is important to identify the relationship between them – understanding how one task will impact another’s start. When scheduling tasks, you’ll typically encounter four common types of dependencies:
- Finish to Start (FS): This dependency means that a task can only begin once its predecessor has been fully completed.
- Start to Finish (SF): This indicates that a task can only be finished if its predecessor starts first—though this type of dependency occurs rarely.
- Start to Start (SS): This defines that a task can only begin once its predecessor starts, either before or simultaneously.
- Finish to Finish (FF): This dependency means that a task can only be completed once its predecessor has been finished, not necessarily simultaneously but in a sequence.
After you are done finalizing the dependencies, you can identify the critical path, which represents the sequence of tasks that are non-negotiable and directly impact the project’s delivery.
Learn in detail about project dependencies and effective ways to manage them
Step 4: Estimate task duration and deadline
Once your tasks and dependencies are clearly defined, the next step is to estimate how long it will take to perform each task. While these predictions may not always be accurate, you can use previous data to determine a reasonable timeframe for your work. You can also set a realistic deadline to tell your team about the time limits they must operate within.
Keep in mind that as the project continues, unforeseen risks, uncertainties, or scope changes may affect the timeframe, causing costly delays, rework, or budget overflows.
Based on the expected buffer time you decided on, you can allocate Slack for each task, stating the length of time a work can be delayed without affecting the next activity or overall.
Step 5: Assign milestones
Milestones appear as critical points within the project timeline. They seem to be guides that significantly determine the overall trend of the progress of the projects. The important checkpoints guarantee clear understanding and progressive development, therefore assuring the project is indeed going right and according to schedule.
Step 6: Allocate resources
At this stage, take the time to assess the specific resources needed to complete your project successfully. By carefully balancing resource allocations and workload—whether it’s your team, equipment, or cost estimation—you can ensure that each resource is utilized efficiently, preventing overuse, underuse, burnout, or unnecessary wastage. This strategic approach helps maintain a smooth workflow and optimizes productivity across the board.
Step 7: Choose the right timeline tool
Finally, selecting the right project timeline tool is key to providing the structure your project needs. While several options are available, Gantt charts stand out as more efficient than manual methods or simple spreadsheets (like Excel).
For an effortless timeline setup and clear visualization, choose a comprehensive project management tool like ProofHub, which has a built-in Gantt chart. Here’s how ProofHub stacks up against the competition:
- A comprehensive solution for successful project execution.
- Integrated Gantt charts to track tasks, deadlines, dependencies, and overall progress, along with toggling between different views.
- Easily assign tasks, set start and due dates, and break them into subtasks to ensure clarity and accountability.
- Built-in time tracking tool to monitor time spent on tasks and adjust the timeline as needed.
- Real-time collaboration via chat, discussions, file sharing, commenting, and more.
- Customizable reports to analyze timeline performance, identify bottlenecks, and improve future planning.
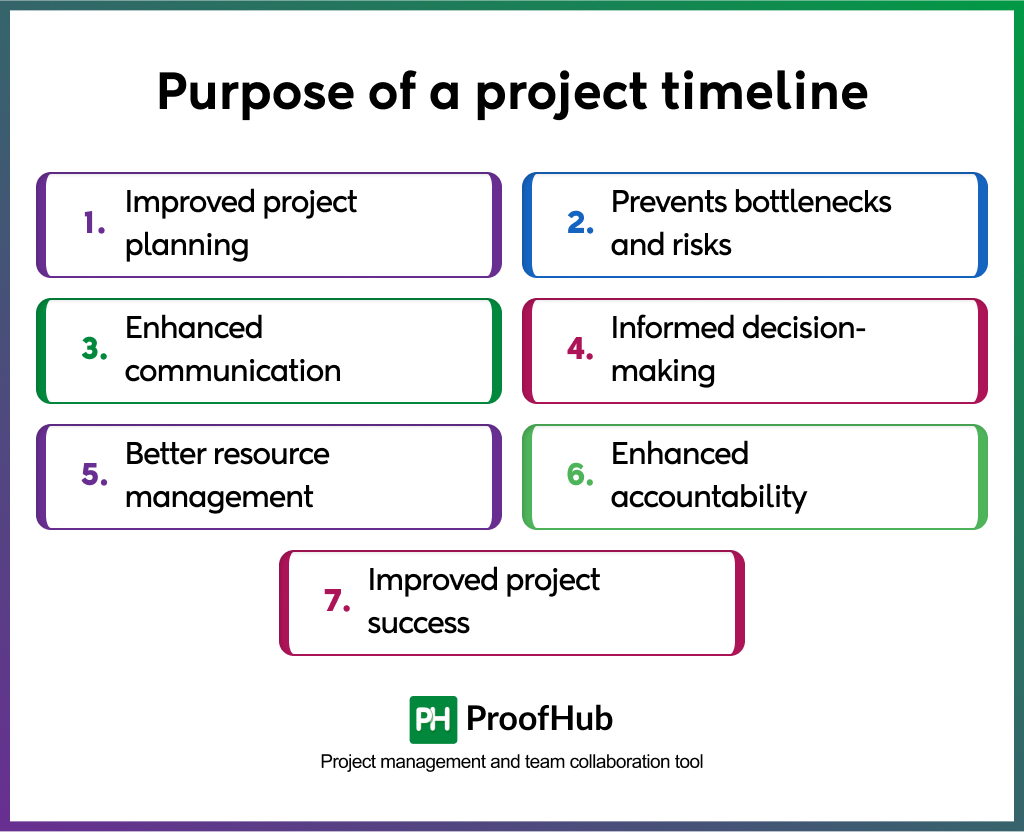
What Is the purpose of a project timeline?
A carefully crafted project timeline is like a roadmap to successful project execution. It not only helps project managers organize workflows but also simplifies the execution process for teams, eliminating guesswork, reducing stress, and preventing confusion.

- Improved project planning: A project map offers a detailed and comprehensive overview of project phases—highlighting deliverables, tasks, activities, deadlines, and resources. It provides project managers with a clear and holistic understanding of the project lifecycle, enabling effective coordination, prioritization, and scheduling.
Discover the comprehensive list of 11 best project planning tools for 2025
- Prevents bottlenecks and risks: With every detail meticulously mapped out— including dependencies, deadlines, and resources—project managers clearly understand the entire workflow. That helps them easily identify unusual disruptions, potential risks, and bottlenecks, enabling proactive action to prevent issues before they become major setbacks. As a result, the project progresses smoothly and remains on track.
- Enhanced communication and collaboration: When you lay out a project timeline, it provides team members with a shared understanding of key milestones, individual responsibilities, and deliverables. This transparency allows them to communicate effectively and work in cohesion, eliminating any scope for misunderstandings and conflicts. It ensures everyone is on the same page, fostering collaboration and driving project success through clearer expectations.
- Informed decision-making: A project timeline serves as a reliable reference guide, allowing teams to refer back to it at any stage of the project for status updates and valuable insights. This practice ensures that every decision made by project managers is supported by solid, actionable data, leading to more informed and effective planning, coordination, and execution.
- Better resource management: A timeline helps project managers allocate resources efficiently—whether it’s personnel, time, or tools—ensuring optimal utilization. By clearly defining tasks, dependencies, and deadlines, it eliminates the risk of resource scarcity, over-allocation, or delays at any stage. This strategic approach maximizes productivity, enhances team efficiency, and keeps projects moving smoothly.
Read More: A complete guide on project resource management
- Enhanced accountability: Timelines offer a detailed view into individual tasks, deadlines, and ownership, helping to reduce procrastination and foster accountability among team members. With clear visibility into responsibilities, teams spend less time navigating uncertainty and more time focusing on meaningful work.
Learn the ways to hold the team accountable for their actions
- Improved project success: Last but not least, a well-constructed timeline ensures that priorities are kept in focus, resources are optimized, and all project domains are streamlined. This approach drives projects toward timely completion while meeting the expected quality standards.
Tools for creating a project timeline
While creating a project timeline is essential, selecting the right tool to bring it to life is equally important. The right tool ensures compatibility with your workflow and simplifies the timeline creation process. Here are three categories of tools to consider:
- Spreadsheet software: Microsoft Excel is one of the versatile spreadsheet solutions for creating project timelines. You can create an effective timeline using formulas, conditional formatting, and charts. Despite its immense popularity, it comes with a learning curve. Excel is the right choice for you if you are good with formulas. But if you are seeking a quick solution, you should look for other available options.
- Online timeline software: If you want a dedicated system with no additional functionalities, then you can choose online timeline tools designed specifically for creating interactive and visually appealing timelines.
- Project management software: These are comprehensive solutions that do not just offer feature-rich Gantt charts to simplify timelines but provide additional features to support end-to-end project management. Especially if you have large or complex projects where Excel is extremely disappointing.
One such solution is ProofHub, which meets all the boxes for creating an insightful project timeline. It has robust functionalities, including Gantt charts, Kanban boards, built-in chat, reports, and more. From allowing you to schedule tasks and assign responsibilities to facilitate collaboration and providing updates on performance, it allows you to stay organized and streamline project timelines.
Best practices for creating a project timeline
Now that you know the essential steps and tools to create a project timeline, here are some best practices that you can follow for that extra edge After all, it is only a detailed and structured timeline that aligns each step towards success.
- Prioritize clarity: It is the foundation for building an efficient project timeline. It begins with defining a clear project scope. Make sure to clearly articulate objectives, deliverables, assumptions, constraints, and dependencies.
- Involve stakeholders: Looping in stakeholders during the timeline planning process is as significant as crafting one. You can draft a timeline built on mutual agreement and shared ownership by incorporating their input, feedback, and expectations.
- Collaborate with the team: While you may feel confident in your initial task completion estimates, I strongly recommend involving your team at this stage for more accurate projections. If consensus seems difficult, aim to find a middle ground that balances expectations and supports practicality.
- Set realistic deadlines: Establish realistic deadlines for each task and milestone, considering the resource workload, availability, and capacity. It should not overburden or overwhelm the team, making them feel drained and stretching work hours.
- Keep timelines flexible: Leave in scope for unexpected challenges, uncertainties, or last-minute changes that may arise. To tackle these unplanned events, you can build buffer time to ensure the timeline remains adaptable and achievable.
- Monitor and update: Make sure to track your project’s progress against an established timeline. Look for any roadblocks, deviations, or bottlenecks that may cause delays, and take corrective actions to maintain accuracy and reliability.
- Regularly review and adjust: Hold periodic check-ins to review the timeline and identify any scope for adjustments or improvements. Incorporate feedback and insights to maintain its credibility and efficiency throughout the project lifecycle.
Examples of project timelines
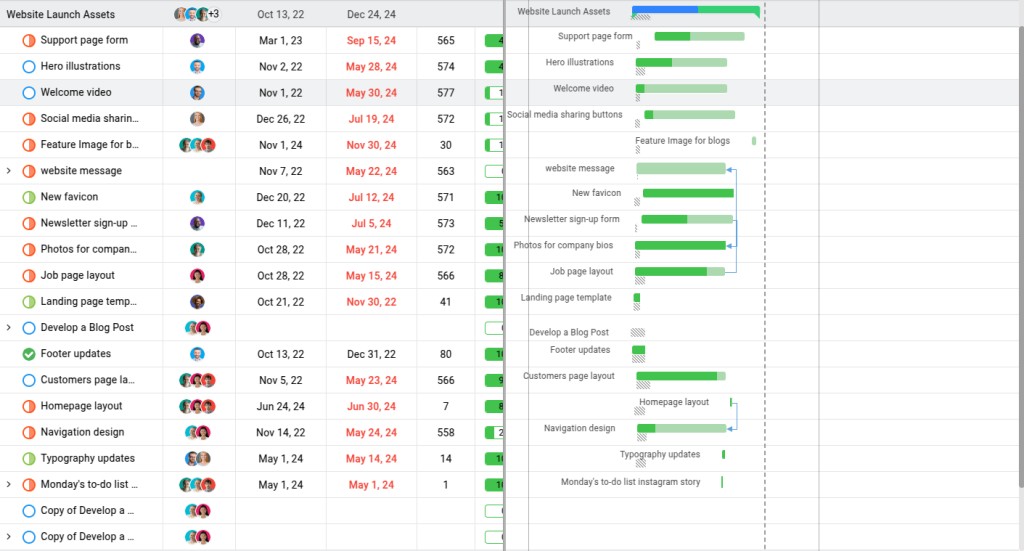
A timeline can be formed for any project with multiple moving parts. Let’s take a look at an example of how a project timeline for the “Website launch assets” can be formed.
- Identify the task list to identify all major deliverables and get a complete understanding of work, such as:
- Support page form
- Welcome video
- Homepage layout
- Footer updates
- Newsletter sign-up form
And more.
- Assign ownership for each task, along with defining task deadlines, duration, and dependencies.
- Establish milestones to highlight critical checkpoints in the project lifecycle.
- Once all tasks are identified, assigned, and scheduled, plot them on a Gantt chart to visualize the timeline. You will see that:
- Each task is displayed as a horizontal bar, where the length represents duration and color indicators show the progress.
- Dotted lines between tasks represent dependencies (e.g., “Website message” must be finalized before “Social media sharing buttons”).
- Completed tasks (like “Footer updates”) are marked to track progress.
- Focus on the critical path to keep the project on schedule.

This will help you provide a bird’s eye overview of tasks, progress, dependencies, bottlenecks, and critical deadlines.
Conclusion
Creating a project timeline is an invaluable practice to keep projects on track. Not only does it help structure a project management framework, but it also acts as a guiding tool for managers and stakeholders to get real-time status and progress updates.
Regardless of how cumbersome the practice may seem, skipping out on creating one isn’t the best practice thing you would like to do for successful project delivery. The time invested is not going to get wasted.
ProofHub is a tool that helps you draft intuitive project timelines and support end-to-end project management. With its all-inclusive feature set, you can set milestones, track progress, and visualize workflows—all in one place – while keeping teams focused, aligned, and collaborating.
FAQs
How to choose the right format for my timeline?
To choose the right format for your timeline, consider the complexity of your project, stakeholder preferences, collaboration level, and the level of visual detail required.
What is the difference between a project timeline and a project schedule?
The key difference between a project schedule and a project timeline lies in its level of detail and purpose. Where a project schedule is highly detailed, listing all activities, their durations, dependencies, resources, and constraints, a timeline is a simplified visual representation of project aspects focused on the sequence and timing of significant events.
What should I do if my project timeline goes off track?
You should follow these key steps whenever you find your project going off the track:
- Monitor progress against the revised timeline to ensure smooth progression.
- Start by thoroughly identifying the current situation and looking for potential root causes and the impact it has on your project timeline. After identifying the issue, determine the best course of action.
- Reallocate resources, shift priorities, and adjust tasks to formulate the corrective action. Make sure to include team members for their invaluable suggestions, take, and feedback.
- Depending on the urgency and severity of the matter, communicate the issue and propose a resolution plan clearly.
- Adjust the timeline to accommodate a new course of action and recover from setbacks.

